I’ve been thinking about statistical paradoxes lately. They crop up all over the place, and they make for fun little puzzles. In this blog I’ll talk about two paradoxes that can occur when doing omnibus statistical tests. Relevant code is attached as a gist at the bottom of the page.
1) A common paradox
There’s a pretty common –and annoying!– statistical phenomenon that most people are probably familiar with when testing whether multiple means are equal to each other (or to some specific value). It is not uncommon that one runs an overall omnibus test and obtains a significant result, allowing for rejection of the overall null hypothesis of equality. However, somewhat paradoxically(?), at the same time none of the followup tests on the individual group means/differences show a significant effect (even without multiplicity correction). So, with mild frustration, we can claim that there’s some difference among the groups but we cannot pinpoint where.
This “paradox” of course is totally understandable. The overall omnibus test looks at all the group deviations at once, so it is possible for the model’s overall deviation to be large enough that we can reject the omnibus null, even if none of the groups show a particularly large deviation themselves. In other words, small deviations among the groups add up to a “large” overall deviation. The most obvious case is the cross-over interaction, with subgroup means showing a1 – a2 > 0 and b1 – b2 < 0. Because they go in opposite directions, the difference between (a1-a2) and (b1-b2) can be large while neither individual difference is itself very large.
After some careful consideration, I’d bet most people come to see this kind of omnibus test behavior to be perfectly reasonable, and not actually a paradox.
But it is simple enough to simulate, so let’s do that and try to “see” the paradox.
Consider for simplicity testing only two group means, where the omnibus null hypothesis is that they are both equal to zero. Assume also for simplicity that the data from the two groups have known standard deviations, so that we can safely use z-values (rather than t-values). If the group means are independent, then to generate their sampling distribution we can simply generate pairs of z-values from standard normal distributions with mean zero and standard deviation one.
A large number of simulated pairs of z-values are shown below with dots. Because they are independent, the pairs scatter around the origin (0,0) in all directions equally, with most pairs relatively close to the origin (the red cross).

Any pair of observable z-values lives somewhere on this plane, with their address given by their coordinates (z1, z2). A natural discrepancy measure in this scenario between the observed pair and the null hypothesis is the distance from the origin to the pair. This is merely the length of the line connecting (0,0) to the point (z1, z2) — i.e., Euclidean distance — which is the hypotenuse of a right triangle with base z1 and height z2. The Pythagorean theorem tells us this length is given by D=√(z1² + z2²). Hence, we would reject the omnibus null only if the observed pair of z-values lives “far enough” away from the middle point of this cloud.
For example, the arrow starts at the origin and points to the pair (1.75, 1.85). The length of this arrow is √(1.75² + 1.85²) ≈ 2.55, i.e. the Euclidean distance from the null hypothesis (0,0) to the point (1.75, 1.85) is about 2.55.
If we call the sum of two squared independent z-values D² (i.e., the squared length from the origin to the pair), this D²-value follows a chi-square distribution with two degrees of freedom (with n tests it has df=n). The omnibus test is then significant only if D² is larger than the 95th percentile of the reference chi-square distribution, which is the value 5.991 for df=2. This region is shown with the circle. Observing any pairs of z-values inside the circle does not lead to rejection of the omnibus null, whereas observing pairs located outside the circle does lead to rejection. As we would expect, about 95% of the simulated pairs live inside the circle, and 5% live outside the circle.
The squared distance from the origin to the pair (1.75, 1.85) is 2.55², or roughly 6.45. This D² is larger than the critical value 5.991, so the pair (1.75, 1.85) would lead us to reject the overall null that both means are zero.
The grey square marks the area where neither individual test would reject its null, so z-pairs outside the box would result in at least one of the individual nulls being rejected. If we only looked at the z1 coordinate, we would reject the null for that test when z1 falls outside the vertical lines, and the same goes for z2 and the horizontal lines. The pair (1.75, 1.85) would therefore not lead to rejection of either test’s individual null hypothesis because it lives inside the box.
Thus, the zone where this “paradox” occurs is anywhere we can observe a pair of z-values that falls outside the circle but inside the box. That is, the paradox occurs in the four inside corners of the grey box. In this case with two groups, that area is quite small — it happens about .25% of the time if the omnibus null is true.
Fun little side result: As you increase the number of independent tests, so not just two tests but n -> infinity tests, the probability of observing all z-values in this “paradox” zone actually approaches 0%. Heuristically, we’d expect that with enough tests, at least one of them will eventually, by chance, get a z-value bigger than 1.96.
The proof is pretty easy. Consider that for any number of tests n the paradox zone is a subset of the inner box (i.e., the “n-cube” in n dimensions) that has sides of length 2*1.96. Then, the probability this paradox occurs is bounded from above by the probability that all n individual z-values are less than 1.96 in absolute value (i.e., that they live inside the n-cube). That probability is .95n when the omnibus null is true, which clearly goes to zero as n increases. Of course, that probability is just an upper bound; the actual probability of the paradox zone can get really small really fast!
2) Rao’s little-known paradox
There is another paradox that can occur when doing omnibus tests, which is less widely known. But I think this one is much harder to resolve, even with drawing a picture! Rao’s paradox is basically the opposite of the previous paradox: The omnibus test of the overall null is non-significant, meaning we cannot reject the null hypothesis that all groups have zero mean (or equal means, etc.). But at the same time, all individual tests show a significant effect, so we can reject each group’s individual null hypothesis.
Kinda freaky right? (Maybe I should have posted this blog on halloween!…)
Rao’s paradox can occur when your tests are not independent. Imagine that you have participants come into the lab and you give them multiple tasks that measure the same general construct. Then it is not inconceivable that people high on the construct tend to score high on both tasks, and people low on the construct tend to score low on both tasks. This would naturally induce a positive correlation between the two sets of scores, and thus between their test statistics. Rao’s paradox could then occur, where you reject the null using task 1, reject the null using task 2, but fail to reject the joint null using an omnibus test.
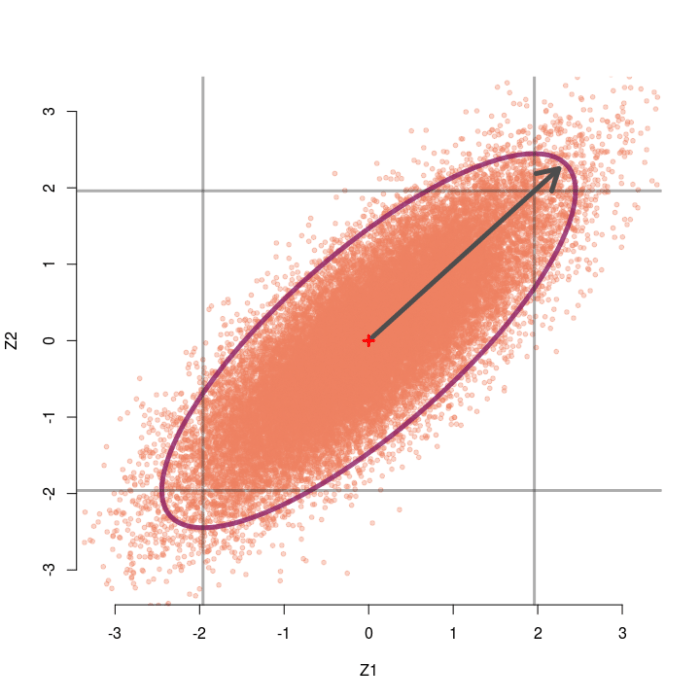
Consider again the case of two testing two group means, but now assume the two z-values are correlated at r=.5. Now we can generate pairs of z-values from a bivariate normal distribution with means of zero, standard deviations of 1, but correlation of .5. The sampling distribution of these correlated pairs of z-values is shown below. Compared to the previous example, this sampling distribution is sort of slanted and elongated at the upper-right and lower-left corners due to the correlation. I’ve also extended the edges of the grey box out a little bit for a reason that will make sense soon.

In this case the omnibus null hypothesis is rejected whenever a pair of z-values falls outside the ellipse. Our test statistic is still a function of the distance between the pair of z-values and the origin, but now we also need to know which direction the z-pair lies in relation to the general orientation of the sampling distribution. Clearly, some pairs of z-values that are close to the origin live outside the ellipse (northwest and southeast directions) and some that are far away live inside the ellipse (northeast and southwest directions).
Instead of the squared Euclidean distance that we used last time, now we will use the squared Mahalanobis distance as our test statistic. The Mahalanobis distance is essentially a generalization of Euclidean distance, to account for the direction and scale of the sampling distribution. In the case of two correlated z-tests, the squared Mahalanobis distance is D² = (1-r²)-1(z1² – 2rz1z2 + z2²), which once again follows a chi-square distribution with 2 degrees of freedom. So once again we reject the omnibus null if D² is larger than 5.991.
Take for example the observe pair (2.05, 2.05). When r=.5, this pair achieves a Mahalanobis distance of D² = 5.60, which is not larger than 5.99 and hence not significant. Thus, we would not reject the omnibus null. However, both z-values alone would normally be considered significant (two-tailed p = .04) and we would reject each individual null hypothesis.
From the picture, we see that any pair that lands outside the inner square, but inside the ellipse, will lead to this paradox occurring. That is, the upper right or lower left outside corners of the box.
As the correlation between tests gets larger, the sampling distribution gets stretched farther and farther in the diagonal direction. Thus, as r gets bigger we can observe larger and larger pairs of z-values (up to a limit) without rejecting the omnibus null. For instance, the sampling distribution for r=.8 is shown below. Even observing the pair (2.25, 2.25) would not reject the omnibus null, despite each individual test obtaining p=.024.
To recap: Rao’s paradox can happen when you have correlated test statistics, which actually can happen a lot. For example, consider a simple linear regression with an intercept and slope parameter. If you do not center your predictor then your sampling distribution of the intercept and slope will very likely be correlated, possibly quite highly!
Are there other cool paradoxes?
If you read this far and know of other statistical “paradoxes” that can happen with omnibus tests I’d love to hear about them (via a comment, twitter, etc.). Also let me know if you would like to see more blogs about other statistical paradoxes, not necessarily just ones related to omnibus tests but just other interesting paradoxes in general. They are pretty fun little puzzles!
Code for the figures:
This file contains hidden or bidirectional Unicode text that may be interpreted or compiled differently than what appears below. To review, open the file in an editor that reveals hidden Unicode characters.
Learn more about bidirectional Unicode characters
| library(MASS) | |
| library(ellipse) | |
| #Helper function to make colors more transluscent | |
| add.alpha <- function(col, alpha=1){#from https://www.r-bloggers.com/how-to-change-the-alpha-value-of-colours-in-r/ | |
| if(missing(col)) | |
| stop("Please provide a vector of colours.") | |
| apply(sapply(col, col2rgb)/255, 2, | |
| function(x) | |
| rgb(x[1], x[2], x[3], alpha=alpha)) | |
| } | |
| #Colors I like | |
| salmon <- add.alpha("salmon2",.35) | |
| maroon <- add.alpha("maroon4",.8) | |
| Grey <- add.alpha("grey20",.4) | |
| #Helper function to compute mahalanobis dist. for vector v & matrix A | |
| #Reduces to Euclidean dist. when A is proportional to an identity matrix | |
| quad.form <- function(v,A){ | |
| Q <- v%*%A%*%v | |
| return(Q) | |
| } | |
| #Now we can do our simulation | |
| set.seed(1337) | |
| r <- 0 #correlation between tests, 0=indep. | |
| k <- 3e4 #replicates | |
| n <- 2 #number of tests | |
| test.z <- c(1.75,1.85) #example z values for r=0 | |
| #test.z <- c(2.05, 2.05) #example z values for r=.5 | |
| #test.z <- c(2.25,2.25) #example z values for r=.8 | |
| mu <- rep(0,n) #Mean vector | |
| sigma <- diag(1-r,n)+ matrix(rep(r,n^2),n,n) #Covariance matrix | |
| tau <- solve(sigma) #Invert cov. matrix | |
| #tau <- 1/(1-r^2)*matrix(c(1,-r,-r,1),nrow=2) #Precise tau for 2 Z tests | |
| Z <- mvrnorm(k,mu,sigma) # generate our z-values | |
| D2 <- apply(Z,1,quad.form,A=tau) # compute our omnibus test statistic | |
| crit <- qchisq(.95,df=n) # critical value of chi-square | |
| #Plot the sampling distribution and add ellipse/circle and box and arrow | |
| plot(Z[,1],Z[,2],xlim=c(-3.2,3.2),ylim=c(-3.2,3.2),col=salmon,pch=20,bty="n",xlab="Z1",ylab="Z2") | |
| lines(ellipse(sigma,level=.95),col=maroon,lwd=5,lty=1) | |
| lines(c(-1.96,-1.96,-1.96,1.96,1.96,1.96,1.96,-1.96), | |
| c(-1.96,1.96,1.96,1.96,1.96,-1.96,-1.96,-1.96),lwd=3,col=Grey) | |
| #abline(v=c(-1.96,1.96),col=Grey,lwd=3) #Extend the lines of the box | |
| #abline(h=c(-1.96,1.96),col=Grey,lwd=3) #Extend the lines of the box | |
| arrows(0,0,test.z[1],test.z[2],col="grey30",lwd=5) | |
| points(0,0,pch=3,col="red",lwd=3) |


